Sharpening Knives
by Mike Casey
Wanting to know how to sharpen a knife I started at the logical place which was to search for a book on sharpening. Sounds simple doesn't it, that is until you find that there is only one book in all of creation on how to sharpen a knife. Yes there is a lot of literature and hype on sharpening but I found only one book. It is "The Razor Edge Book of Sharpening" written by John Juranitch. Mr. Juranitch has been a professional knife sharpener and consultant for over forty years. I recommend that anyone serious about sharpening purchase his book at Razor-Edge and visit KnifePlanet.
In Janurary of 2007 Steve Bottorff contacted me and said he had written a book "Sharpening Made Easy." I have review this book and found it to be the most complete knife sharpening book I have read to date.
Knives are sharpened on an abrasive material which usually comes in the form of a hone or stone. These can be an oil hone, a dry hone, a wet hone, a diamond dust hone; I am sure the list goes on, but you get the idea. I used to grind away, hour after hour, believing that the secret to a sharp edge was patience. Patience won't give you a sharp edge, no matter how long you grind, but knowledge will.
Now, right here in the beginning, I am going to divulge the secrets to sharpening a knife. These are secrets which eluded me for the past forty years. The first part of the secret is that you must maintain a constant angle between the knife blade and the hone. This is something which most mortals can't do without some sort of a fixture. The rest of the secret is that you must grind a relief until you get a burr, then you must grind a secondary edge until you get a burr. That's it, that's all there is. If you understand this you can put a sharp edge on any knife everytime.
Alas, it seems that a lot of people interested in knife sharpening have invented and marketed some sort of a fixture or sharpening device. While there may be many good sharpening devices, I know of only two. The first and least expensive is the Sharpening Guide from Razor-Edge. This Sharpening Guide is small, easy to use, and gave me my first sharp edge. This unit may be perfect for you and you need search no further. But, I wanted to be able to set the sharpening angle with precision and wanted a larger selection of hones.
The final solution was from Edge Pro Sharpening Systems which has the Apex and Professional models. I purchased the professional model which is probably the most expensive and most precise sharpening system available. I might also add it is the fastest and gives the best edge. But, its primary advantage is that it can be adjusted to an exact angle. This enables you to go back and touch up a primary edge without having to start at the beginning and regrind the relief, as you must with other systems. This is the Rolls-Royce of sharpening systems, and of course, at a Rolls-Royce price. I may add that I have since given my Razor-Edge system to my son, who is perfectly happy with it.
Measuring Sharpness
Testing sharpness by cutting paper just doesn't cut it. Rasor-Edge produces an Edge Tester which is very useful. But the problem with most testing methods is that they are subjective. You just can't quantify your test with a number. This is why I develop a simple but effective method of testing the sharpness of an edge. The method is simplicity itself. This is so simple that many others must have used it before me, and I have just reinvented it. Just hang a loop of thread over the blade and see how much weight it can lift before cutting the thread. That weight is the sharpness number. Now the details:
- I used thin cotton sewing thread. I realize this is not an exact description of the thread but you will see in the next step that it doesn't really matter.
- Next go to the store and purchase a package of Gillette double edge razor blades. I chose this because it is the sharpest inexpensive device I know of which we can all obtain. Your sharpness number will be relative to the Gillette blade.
- Make a loop in the thread and hang it from the razor blade. Add weight to the loop until the thread cuts. I found that the Gillette blade cut the thread when 4 ounces of weight was suspended from it. I measured the weight using a digital postage scale.
- My sharpened Chicago kitchen cutlery measured 9 ounces. I double edged my Spyderco Military folding knife, with CPM 440V steel, and measured from 6.5 to 7.2.
Sharpening Chicago Cutlery
- Set the Edge Pro to the red mark 15°.
- Grind in the relief on one side using the course stone.
- When the burr appears grind in the relief on the opposite side.
- When the burr appears switch to the 180 grit stone on the opposite side and continue grinding the relief until the burr appears then switch to the opposite side.
- After grinding the relief on both sides using the 180 grit, adjust the angle to the blue mark 19°.
- Grind the secondary edge on each side, making sure you have a burr each time.
- Lightly grind until the burr disappears.
- Lightly stroke approximately four times on each side using the ceramic steel.
- The knife should now have a sharpness of around 9.
- Set the angle at 15°
- Choose the 100-Grit/Coarse stone (these are wet stones so you must add water)
- Grind until you feel a burr as shown in figure 3. You probably won't be able to see the burr but you will definitely be able to feel it on the side opposite from the side you are grinding. You can feel the burr by dragging your finger across the bottom edge of the knife blade. You must have a burr running the entire length of the blade. Don't continue to step 5 until you have the burr.
- Flip the knife over and grind until the burr runs the entire length of the opposite side.
- Flip the knife over and choose the 180-Grit/Medium stone.
- Grind until you get the burr.
- Flip the knife over and grind the burr on the other side.
- Set the angle to 19°
- Choose the 100-Grit/Coarse stone
- Grind until you feel the burr
- Use plenty of water
- Flip the knife over and grind until you get the burr on the opposite side.
- Choose the 180-Grit/Medium stone.
- Grind until you get the burr.
- Flip over and get the burr on the other side.
- Flip the knife over and grind until the burr just goes away
I chose Chicago Cutlery because it is one of the most common knives found in the home or restaurant and it is easy to sharpen. The sharpening fixture used will be the Professional by Edge Pro Sharpening Systems.
Quick Start
If you just want to get on with it without a lot of explanation then this is the place for you. If you want a detailed explanation then skip down to Detailed Explanation.
Detailed Explanation
You can have the best sharpening system in the world but you won't get a sharp knife unless you grind a relief. All sharp knives and razor blades have at least two edges, the relief and the secondary edge. Failure to put both of these edges on a knife is a major reason for sharpening failure. Your knife must first have a relief then a secondary edge ground on top of it.
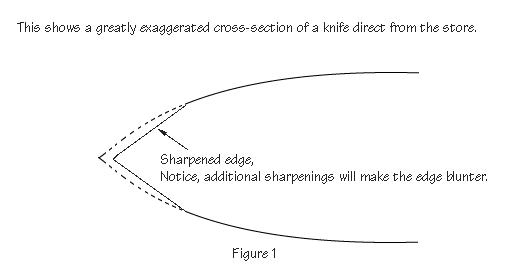
Figure 1 shows the cross-section of a typical knife as it comes from the factory. There is no relief and a secondary edge is ground into the edge of the knife. Each time you sharpen the secondary edge the knife will become blunter.
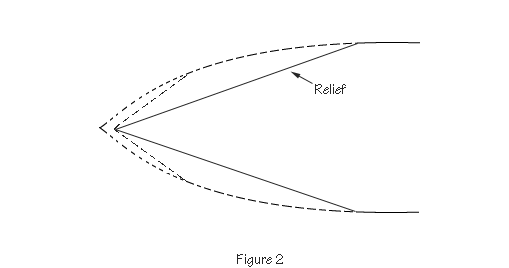
Using the Coarse stone, you must grind a relief as shown in figure 2. A relief should have a minimum width of 1/16" but it can be much wider. You can grind the relief all the way back to the edge of the knife if you want to remove that much metal. I suggest you start off with a maximum relief angle of 15° but there is nothing wrong with 13°.
Since your relief has such a small angle, the edge of the blade will be weak and dull easily. We will take care of that later when we add the secondary edge.
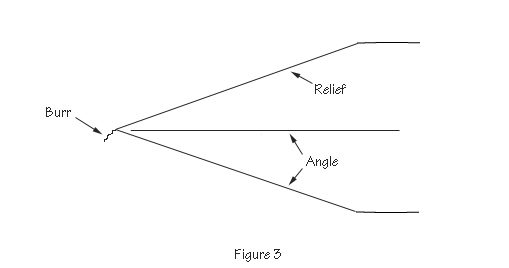
The following are the steps for grinding the relief:
Now you are ready to add the secondary edge, as shown in figure 4, which will increase the sharpness and strength of the edge.
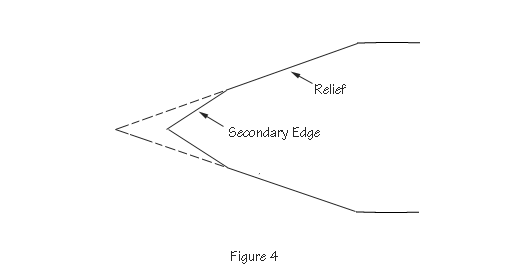
The following are the steps for grinding the secondary edge:
Now, lightly stroke the knife edge approximately four times on each side using the ceramic steel. That's it, you are done. The secondary edge will be about the width of a thin piece of sewing thread. The next time your kitchen knife starts to get dull, just stroke it with the ceramic steel. Feel for a burr. If you find one lightly stroke on the burr side to remove it.
You may be asking, what shall I do with the rough steel sharpening rod Chicago Cutlery supplied when I purchased my knives? I suggest that you throw it into the trash ben to prevent a friend from accidentally re-sharpening some of your knives. This wood rasp sharpens by putting a rough edge on the knife, thereby causing the knife to act as a saw.
Double Edging a Knife
- Relief 13°
- Secondary Edge 17°
- Primary Edge 19°
- 220-Grit/Fine, be sure to get the burr on each side and use plenty of water
- 320-Grit/Extra Fine, be sure to get the burr on each side and use plenty of water
- 600-Grit/Extra Fine, be sure to get the burr on each side and use plenty of water
- 3000-Grit/Polishing Tape, remove the burr, use no water
- 320-Grit/Extra Fine, use plenty of water
- 600-Grit/Extra Fine, remove any burr, use plenty of water
- 3000-Grit/Polishing Tape, remove any burr, use no water
Grinding a relief can add ugly to any knife; so, you probably don't want to double edge a Trophy knife. However, you may have a working knife, such as a folding knife, which you want to make razor sharp.
Start by using the angles shown below and following the steps above for Sharpening Chicago Cutlery. Don't ceramic steel the edge.
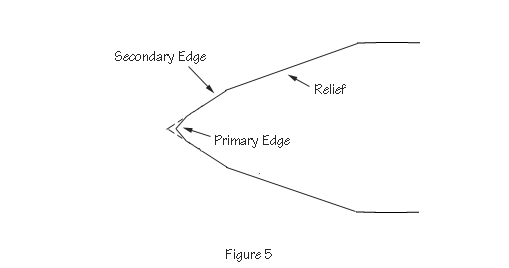
In figure 5 you can see that we will be grinding the Primary Edge into the Secondary Edge. The following angles are not set in stone and you may vary them as you see fit. In general the angles I start with are:
After completing the secondary edge, as shown above in the section Sharpening Chicago Cutlery, continue sharpening the secondary edge using a finer hone each time:
Now set the angle for the primary edge. Note: you will be removing only a slight amount of metal and probably won't feel a burr. Just grind the primary edge ten times on each side as follows:
That's it, congratulate yourself, you have just double edged a knife and it is probably sharper than any knife you have ever handled. The angle of the primary edge will insure that the knife will remain sharp long after most knives have become dull.